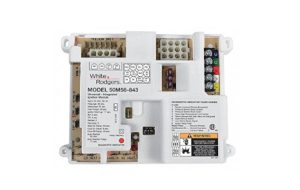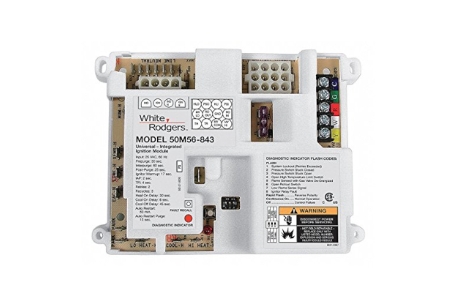
White-Rodgers 50M56U-843 Universal Integrated Control
- Brand
White-Rodgers
Color
White
Form Factor
Module
Indoor/Outdoor Usage
Indoor
Mounting Type
Floor Mount
$209.98
When my furnace decided to quit during the coldest week of winter last year, I found myself staring at a cryptic control board with blinking lights and no idea what to do next. After hours of research, frustration, and eventually success, I realized how valuable a comprehensive guide would have been. So here I am, sharing everything I’ve learned about the White Rodgers 50M56 843 control board – the brain behind many of our heating systems.
Understanding the Heart of Your HVAC System
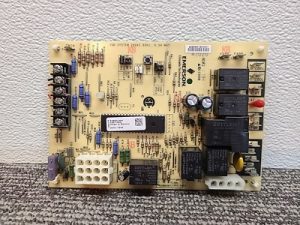
Let me start by saying that the control board in your furnace is essentially its brain. Before my heating emergency, I barely knew these components existed, let alone understood their importance. The White Rodgers 50M56 843 is one of the most common control modules in residential HVAC systems, and understanding it can save you time, money, and a lot of headaches.
What Exactly Is the White Rodgers 50M56 843?
The White Rodgers 50M56 843 is a universal replacement control board designed for furnaces and HVAC systems. Think of it as the central command center that coordinates all the heating operations in your home. This particular model is known for its versatility and reliability, which is why it’s found in countless homes across America.
When I first encountered this board, I was intimidated by all the terminals, connectors, and electronic components. But don’t worry – by the end of this article, you’ll understand what each part does and how they work together to keep your home comfortable.
The White Rodgers 50M56 843 control board manages the entire heating process from the moment your thermostat calls for heat until warm air is flowing through your vents. It controls the ignition sequence, monitors safety systems, regulates blower speeds, and even communicates system status through diagnostic LED lights.
The Inner Workings: How Does It Actually Function?
Understanding how this control board works helped me appreciate the complexity behind that simple thermostat adjustment. Here’s the basic sequence:
- Your thermostat sends a signal requesting heat
- The control board initiates the heating sequence
- It powers up the inducer motor to create draft
- Checks pressure switches to ensure proper airflow
- Activates the ignition system (either hot surface ignitor or spark ignitor)
- Opens the gas valve when ignition is confirmed
- Monitors the flame sensor to verify continued combustion
- Controls the blower motor to distribute heated air
- Constantly monitors safety parameters throughout operation
- Shuts down components in the correct sequence when heating is no longer needed
What impressed me most is how the board handles multiple tasks simultaneously while constantly checking safety parameters. If any safety issue is detected, the board will shut down the system to prevent damage or dangerous conditions.
The 50M56 843 is designed to be compatible with various gas furnaces and can be configured for different heating systems through dip switch settings. This versatility is what makes it such a popular replacement option when original equipment fails.
When and Why You Might Need a Replacement
After researching extensively, I learned that control boards typically last 10-15 years, though many factors can influence their lifespan. Environmental conditions like humidity, dust accumulation, power surges, and even the quality of your home’s electrical system can affect durability.
Signs Your Control Board Might Be Failing
During my own furnace crisis, I noticed several symptoms that pointed to a failing control board. Here are key indicators to watch for:
- Furnace won’t start or runs intermittently
- Blower motor runs continuously or not at all
- LED status lights showing error codes or not lighting up
- Strange clicking noises coming from the control area
- Furnace starts but quickly shuts down (short cycling)
- No response to thermostat adjustments
- Components like the ignitor activate out of sequence
- Frequent tripping of circuit breakers
- Burning odors near the control panel
When my furnace began short cycling and showing erratic LED patterns, I initially hoped it was something simple. After checking filters, thermostat settings, and other basics, I reluctantly began researching control board replacements.
Common Problems with the White Rodgers 50M56 843
Even reliable components like the 50M56 843 can develop issues. The most common problems I discovered include:
- Relay failures: The board contains several relays that can wear out from repeated use
- Electrical component degradation: Capacitors and resistors can fail over time
- Circuit board damage from power surges or electrical storms
- Moisture damage from condensation or leaking components
- Corrosion on connection points
- Failed microprocessor
- Damaged or loose wire connections
- Heat damage from nearby components
In my case, I discovered that several of the board’s relays had failed, preventing proper sequencing of the heating cycle. What I initially thought was a major furnace overhaul turned out to be a relatively straightforward control board replacement.
Finding the Right Replacement: What to Look For
When I began searching for a replacement board, I quickly realized that finding the exact right model was crucial. The White Rodgers 50M56 843 is itself a universal replacement board, but you need to ensure it’s compatible with your specific furnace.
Compatibility Considerations
Before purchasing a White Rodgers 50M56 843, verify compatibility with your furnace brand and model. This board works with many major brands including Rheem, Ruud, Weatherking, and others, but checking your existing board and furnace documentation is essential.
I learned that the 50M56 843 is designed to replace several older White Rodgers models including the 50A50, 50A51, 50A52, 50A55, and others. It also replaces some OEM boards from various manufacturers.
To determine compatibility, I had to:
- Identify my furnace’s make and model
- Look up the original control board part number
- Check the White Rodgers cross-reference guide to confirm the 50M56 843 would work
- Verify voltage requirements matched (24VAC control systems)
- Ensure the physical dimensions would fit in my furnace’s control compartment
- Confirm connector types and terminal designations were compatible
Taking photos of my existing board’s connections before removal was incredibly helpful during installation. I’d recommend this step to anyone undertaking this replacement.
Specifications That Matter
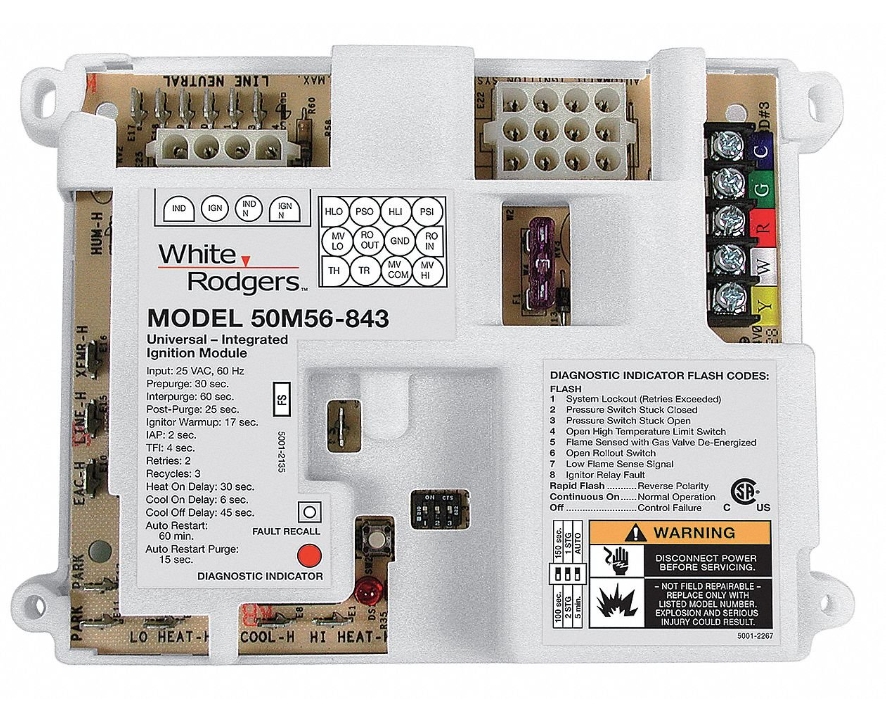
The White Rodgers 50M56 843 comes with impressive technical specifications that make it versatile for various systems:
- Input voltage: 24VAC (18-30VAC range)
- Frequency: 60Hz
- Operating temperature range: -40°F to 175°F
- Humidity range: 5% to 95% non-condensing
- Dimensions: Approximately 8″ x 5″ x 1.5″
- Supports multiple ignition types (hot surface, intermittent pilot, direct spark)
- Compatible with single-stage gas valves
- Includes various timing options for pre-purge, post-purge, and ignition trials
- Configurable for different blower speeds and delay settings
- Built-in diagnostics with LED status indicators
- Flame sensing current: 0.5 microamps minimum
Understanding these specifications helped me confirm that this board would not only fit physically but would also work electrically with my existing furnace components.
Where to Purchase: Finding Reliable Sources
After deciding the White Rodgers 50M56 843 was right for my system, I needed to find a reliable supplier. Here are the options I considered:
- HVAC Supply Houses: Professional suppliers often carry these boards and can offer technical advice, though they sometimes only sell to licensed contractors.
- Online HVAC Parts Retailers: Specialized HVAC parts websites typically have detailed information and compatibility guides.
- Major Home Improvement Stores: Some larger chains carry professional-grade HVAC parts, though selection may be limited.
- Amazon and Other Marketplaces: These can be convenient but require careful verification of the seller’s reputation and return policies.
- Direct from Manufacturer: Sometimes possible through White Rodgers/Emerson’s official channels.
I ultimately purchased from a specialized online HVAC parts retailer after comparing prices, warranty terms, and shipping options. The board cost between $200-$250, which was significantly less than the $500+ quote I received for a service call that included parts and labor.
When ordering, I made sure to check for:
- New (not refurbished) condition
- Full manufacturer warranty
- Return policy
- Proper packaging to prevent shipping damage
- Included documentation and installation guides
The Installation Process: A Step-by-Step Guide
Installing the board myself saved hundreds of dollars, though I approached the task with appropriate caution. Here’s the process I followed:
Safety First
Before touching anything in your furnace:
- Turn off power at the furnace switch AND circuit breaker
- Shut off the gas supply
- Wait several minutes for components to cool and discharge
- Use a multimeter to verify power is disconnected
- Work in a well-lit area with adequate space
Tools and Materials Needed
I gathered these tools before starting:
- Phillips and flathead screwdrivers
- Needle-nose pliers
- Wire cutters/strippers
- Electrical tape
- Zip ties for wire management
- Digital camera or smartphone for taking reference photos
- Multimeter for testing
- Anti-static wrist strap (optional but recommended)
- The new control board
- Manufacturer instructions
The Removal and Installation Process
Here’s my step-by-step approach:
- Document everything: I took multiple photos of the existing board from different angles, paying special attention to wire connections.
- Label wires: Even though most connections are color-coded, I used masking tape to label each wire with its terminal designation.
- Remove one wire at a time: Starting with the smallest connectors, I carefully disconnected each wire, keeping them organized.
- Remove mounting screws: Most boards are secured with 3-4 screws or clips.
- Compare boards: Before installation, I compared the new and old boards to identify any differences in terminal locations or dip switch settings.
- Set dip switches: I configured the dip switches on the new board to match my system requirements (using the manual and settings from the old board).
- Mount the new board: Secured it using the existing screw holes.
- Connect wires: Working methodically, I connected each wire to its corresponding terminal on the new board.
- Double-check connections: I verified each connection against my reference photos.
- Secure wiring: Used zip ties to keep wires organized and away from hot components.
- Replace covers: Reinstalled all furnace panels before testing.
The entire process took me about 90 minutes, moving carefully and methodically. The most challenging part was ensuring the tiny wires were fully inserted into their terminals without damaging them.
Testing the New Installation
With everything connected, it was time for the moment of truth:
- Restored gas supply
- Turned power back on at the circuit breaker
- Set thermostat to “OFF” position
- Turned on the furnace switch
- Observed the LED status light (solid light indicating normal standby)
- Set thermostat to “HEAT” and raised the temperature setting
- Watched the startup sequence, listening for normal operation sounds
- Verified warm air from vents within a few minutes
- Monitored through a complete heating cycle
I cannot describe the satisfaction of hearing that ignition sequence start and feeling warm air flowing through the vents again!
Troubleshooting Common Issues
Despite careful installation, sometimes issues can arise. Here are some troubleshooting steps I learned:
LED Status Codes
The 50M56 843 communicates problems through LED flash codes:
- Steady ON: Normal operation
- 1 flash: System lockout (failed ignition)
- 2 flashes: Pressure switch problem
- 3 flashes: Pressure switch stuck closed
- 4 flashes: High limit switch open
- 5 flashes: Flame sensed when no flame should be present
- 6 flashes: Line voltage polarity reversed
- 7 flashes: Low flame current
- 8 flashes: Ignition fault
- Continuous rapid flashing: Internal control failure
Understanding these codes helped me diagnose a pressure switch issue that occurred after installation.
Resetting the Control Board
If the board enters lockout mode, you can reset it by:
- Turning the thermostat to “OFF”
- Cutting power at the furnace switch for 30 seconds
- Restoring power
- Setting thermostat back to “HEAT”
This simple reset resolved my pressure switch alert and has been useful for occasional glitches since.
Using a Multimeter for Diagnosis
A basic multimeter is invaluable for testing:
- Input voltage to the board (should be 24-28VAC)
- Continuity of safety switches
- Proper voltage output to components
- Resistance values of ignitors and sensors
I used mine to confirm that all components were receiving proper voltage after installation.
Advanced Topics: Beyond the Basics
Once I became comfortable with the basic operation, I explored some advanced aspects of the White Rodgers 50M56 843.
Configuration Options Through Dip Switches
The small switches on the board allow customization for different systems:
- Ignition type selection (hot surface, direct spark, etc.)
- Pre-purge timing adjustments
- Post-purge duration settings
- Heat blower-on delay
- Heat blower-off delay
- Cooling blower-off delay
- System type selection
Adjusting these settings can optimize performance for your specific furnace. I experimented with longer blower run times to improve air circulation and efficiency.
Comparing with Similar Models
The 50M56 843 is part of a family of similar boards. Key differences between models include:
- Supported ignition types
- Number of supported stages (single vs. multi-stage)
- Compatibility with specific brands
- Advanced features like humidity control
- Communication capabilities with smart thermostats
I found that the 843 model offered the best balance of features and compatibility for my system without unnecessary complexity.
Repair vs. Replace Considerations
While complete replacement is usually recommended, limited repairs may be possible:
- Fuse replacement if applicable
- Fixing loose connections
- Cleaning corrosion on terminals
- Repairing cold solder joints (for those with electronics experience)
I attempted to repair my original board by resoldering some visibly damaged connections, but ultimately the multiple failed components made replacement more practical.
Long-Term Maintenance and Care
To extend the life of my new control board, I implemented these maintenance practices:
Preventative Measures
- Regular filter changes: Airflow restrictions can cause overheating
- Annual professional inspections: Catch issues before they damage the board
- Keeping the furnace area clean and dry: Dust and moisture are enemies of electronics
- Surge protection: A whole-house surge protector helps prevent electrical damage
- Proper thermostat settings: Avoid frequent cycling that stresses components
Optimal Operating Conditions
The control board performs best when:
- Ambient temperature stays between 40°F and 90°F
- Humidity remains below 80% non-condensing
- Electrical supply is stable without fluctuations
- Furnace compartment is clean and well-ventilated
I added a small dehumidifier in my basement near the furnace to maintain better conditions.
Documentation for Future Reference
I created a maintenance file containing:
- Purchase receipt and warranty information
- Photos of the installed board
- Notes on dip switch settings
- Dates of filter changes and maintenance
- Contact information for HVAC professionals if needed
This documentation will be invaluable for future troubleshooting or when I eventually need to replace the board again.
The Cost Factor: Budgeting for Replacement
When budgeting for a control board replacement, consider these factors:
Price Range and Considerations
The White Rodgers 50M56 843 typically costs between $180-$280 depending on the source. Factors affecting price include:
- Supplier type (wholesale vs. retail)
- New vs. refurbished condition
- Warranty length
- Included accessories or documentation
- Shipping costs for online purchases
Professional Installation vs. DIY
Professional installation adds $200-$400 to the cost, bringing the total to $400-$700. This premium provides:
- Expert installation and testing
- Possible warranty on labor
- Proper disposal of old components
- Professional diagnosis of any related issues
My DIY approach saved approximately $300, but required research time and comfort with electrical components.
Warranty Considerations
The standard warranty on the White Rodgers 50M56 843 is typically 1-5 years, depending on the supplier. When purchasing, I prioritized retailers offering longer warranties even at a slightly higher price.
Some suppliers offer extended warranties for an additional fee. These can be worthwhile if:
- Your HVAC system is in a challenging environment
- You’ve had previous electrical issues
- The cost of emergency service in your area is high
- Peace of mind is particularly valuable to you
Alternative Options to Consider
While researching, I discovered several alternatives to the White Rodgers 50M56 843:
Universal Replacement Boards
Other universal options include:
- Honeywell S9201A1015
- ICM ICM2801
- Robertshaw Universal HSI board
- Goodman PCBBF132S
These vary in features, compatibility, and price points. The White Rodgers offered the best match for my system, but your needs may differ.
OEM-Specific Replacements
Manufacturer-specific boards may offer:
- Perfect fit for your exact model
- Potentially simpler installation
- Full compatibility with all features
- Often higher cost than universal options
For certain premium brands, I found that OEM parts were the only reliable option.
Upgrade Opportunities
A control board replacement can be an opportunity to upgrade your system:
- Adding programmable features
- Improving efficiency
- Enhancing diagnostics capabilities
- Better compatibility with smart home technology
I considered a more advanced model but ultimately chose the direct replacement for simplicity and cost-effectiveness.
Final Thoughts: Lessons Learned
My journey with the White Rodgers 50M56 843 transformed me from a frustrated homeowner to a confident DIY technician. The experience taught me several valuable lessons:
- Understanding the fundamentals of how your heating system works empowers you to make informed decisions.
- Proper documentation before and during projects saves time and prevents mistakes.
- Taking time to research compatibility prevents expensive errors.
- HVAC systems are complex but logical – with patience, most homeowners can learn to maintain and repair them.
- The satisfaction of solving your own heating emergency is immeasurable.
What started as an inconvenient furnace failure became an opportunity to develop new skills and knowledge. While I hope your furnace remains trouble-free, should you ever face a control board issue, I trust this guide will make your journey smoother than mine was.
Remember, when in doubt, consult with a professional technician. Some repairs are best left to experts, particularly if you’re uncomfortable working with electrical components or if your system is under warranty.
Have you dealt with control board replacements in your home? What was your experience like? I’d love to hear your stories and any additional tips you might have for fellow homeowners facing similar challenges.
Stay warm and comfortable!
Frequently Asked Questions
To wrap up this comprehensive guide, here are answers to some common questions about the White Rodgers 50M56 843:
Q: How do I know if the White Rodgers 50M56 843 is compatible with my system?
A: Check your existing board’s model number and consult the White Rodgers cross-reference guide. The 50M56 843 replaces many 50A50, 50A51, 50A52, and similar series boards.
Q: Can I install this board myself without professional training?
A: Yes, with proper research, caution, and basic electrical knowledge. However, if you’re uncomfortable working with electrical components, professional installation is recommended.
Q: How long should the White Rodgers 50M56 843 last?
A: Typically 10-15 years, though this varies based on usage patterns, environmental conditions, and power quality.
Q: Where can I find a wiring diagram for this board?
A: Wiring diagrams are included in the installation instructions that come with the board. They’re also often available on the manufacturer’s website or in your furnace’s service manual.
Q: What should I do if the board doesn’t work after installation?
A: First, verify all connections and dip switch settings. Check the LED status for error codes. Ensure power is properly supplied to the board. If issues persist, consult the troubleshooting section of the manual or contact technical support.
Q: Is it normal for the board to make clicking sounds?
A: Yes, occasional clicking indicates relays activating, which is normal during startup and shutdown sequences. However, rapid or continuous clicking may indicate a problem.
Q: Can this board control variable-speed blowers?
A: The 50M56 843 works with multi-speed blowers but not true variable-speed ECM motors without additional interfaces.
Q: What causes premature failure of control boards?
A: Common causes include power surges, water damage, excessive heat, dust accumulation, and voltage fluctuations.
Q: How do I properly store a spare control board?
A: Keep it in the original anti-static packaging, in a cool, dry place away from electromagnetic fields and extreme temperatures.
Q: Can I transfer the programmed settings from my old board?
A: No, you’ll need to manually configure the new board using the dip switches according to the manufacturer’s instructions.